JUnit is used for unit testing of Java applications. JUnit and TestNG are two popular unit testing frameworks. In this tutorial I will explore JUnit only.
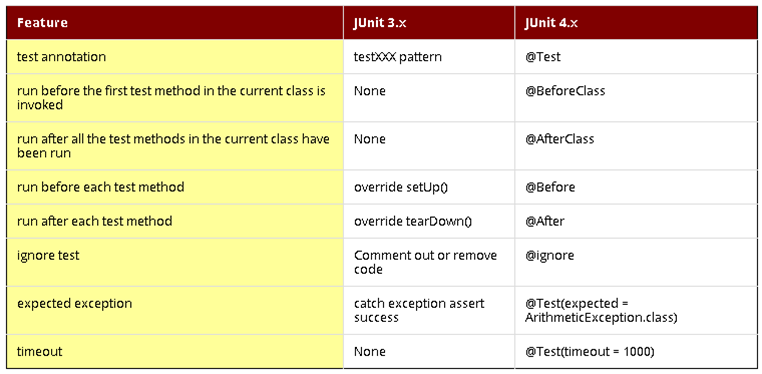
There are two popular version of JUnit – JUnit 3 and JUnit 4. Below table shows few important differences in these versions . Apart from this there is one more important difference that from JUnit 4.7 parallel execution of JUnit test cases is supported.
JUnit 3.x Sample
import junit.framework.*;
public class MoneyTest extends TestCase {
	private Money f12CHF;			// fixtures
	private Money f14CHF;

	protected void setUp() {		// create the test data
		f12CHF = new Money(12, "CHF");
		f14CHF = new Money(14, "CHF");
	}
   void testAdd() {				// create the test data
		Money expected = new Money(26, “CHF”);
		assertEquals(“amount not equal”,
                     expected,f12CHF.add(f14CHF);
	}
	...
}
JUnit 4.x Sample
import junit.framework.*;
import org.junit.*;
import static org.junit.Assert.*;
public class MoneyTest <del>extends TestCase</del> {
	private Money f12CHF;
	private Money f14CHF;

	@Before
        public void setUp() // setup, teardown function names are not mandatory now as we have annotations now
        {
		f12CHF = new Money(12, "CHF");    // - the fixture
		f14CHF = new Money(14, "CHF");
	}
	@Test
        public void testAdd() // create the test data
        {
		Money expected = new Money(26, “CHF”);
		assertEquals(“amount not equal”,
                     expected,f12CHF.add(f14CHF));
	}
	...
}
Following changes were happened in JUnit 4.x
- No need to start test method name with prefix “test”.
- @BeforeClass and @AfterClass were introduced
- @BeforeClass method – executes only once; before the first test method
- @AfterClass method – executes only once; after the last test method
- Instead of setup and tearDown now JUnit 4 has @Before and @After annotations.
- @Before method – executes every time; before the test method.
- @After method – executes every time; after the test method.
- @Ignore was introduced to skip a test case while running.
- “expected” was introduced to tell JUnitRunner that what exception we are expecting. Example : @Test(expected=ArithmeticException.class)
- “timeout” was introduced to put a time limit on a testcase. If test does not complete in that time limit, an exception will raise with message “test timed out after xxx milliseconds”
Next posts will show the working examples with these annotations.
Nice article Rahul.